
Let’s face it—getting a new customer isn’t easy.
You need to guide them through each stage of the funnel: make them aware of your product, help them realize its value, and choose it over other options on the market. That’s why it feels so incredibly rewarding when you see your conversion rates rising—people are recognizing all the hard work you’ve done!
A lot of businesses believe that, once a user converts, the hard part is done.
While that may be true to some extent, your job is far from over. Now starts the arguably more important part of the job: getting those users to stay with you for a long time.
One of the best ways to turn first-time buyers into loyal advocates is user onboarding.
Read on and find out how you can get the most out of user onboarding with the help of personalized video.
What is user onboarding and why does it matter?
“User onboarding” is a popular term in the SaaS industry and it signifies the process of making the user more familiar with your product/service during their first interactions.
It’s done to increase the level of success a user has with your product. It helps them find value in the product and, in the process, become more likely to stay with you in the long run.
There are many reasons why brands choose to start onboarding their users.
For one, it seems that returning customers generate significantly more revenue. From a financial standpoint, it makes much more sense to invest in turning someone into a regular customer than to try and acquire new customers.
Perhaps more importantly, the majority of your users will likely opt out during the first week. Stats even suggest that the average app on Google Play loses 77% of users the first three days after the install and up to 90% of users after the first month.
A way to bend this curve is to provide value in the first few days, especially during the first visit. Help your users realize the value of your product as early in the process as possible and set them up for success.

Onboarding video: the basics
One of the best ways to provide value to your users in the early stage of their experience with your product is through personalized videos.
They allow you to be direct and create a deeper connection with your users, potentially increasing the chance of them turning into long-term advocates. More importantly, they allow you to direct the users to the most valuable aspects of your service.
Here’s what you need to do to make the most out of your user onboarding videos.
Get personal
There is no point in making a customer video if you don’t address them directly!
You want to use this opportunity to call the user by their name and mention as much data as you have about them. Studies have found that personalized communication can increase brand loyalty by 28%, especially in the millennial population.
So, if you want to work on increasing loyalty, personalization seems to be a trend of the future.
Even starting the video with the customer’s name will be a good step towards creating a more honest, customer-centric approach.
Speak your customers’ language
Get familiar with your target audience and use this to get closer to them in your videos!
If you’re selling a social media automation tool, chances are most of your customers will be relatively young, hip, tech-savvy people. You won’t have to explain basic concepts like automation or KPIs.
You can go even further and change your tone slightly for each new customer. If you have access to their information (perhaps you can find them on LinkedIn), use this to deliver a tailored video. For example, a c-level manager and a twenty-something social media manager shouldn’t be addressed the same way.
Successful brands have been doing this for quite some time. They don’t even have to tell you who their ad is for—you can tell by simply looking at the messaging and visuals. Check out this Fanta ad as an example:

Source: Ad Ruby
Clearly, Fanta is targetting teens in this ad—something they’ve been doing for years now.
Point them to key resources
You want to use your onboarding video to instantly tell your users where they need to go to get a head start with your tool. If you have an FAQ section on your website or a set of tutorials, that’s a perfect place to send them to for the latest tips and tricks.
You might also want to direct your customers to the specific content or features of your product.
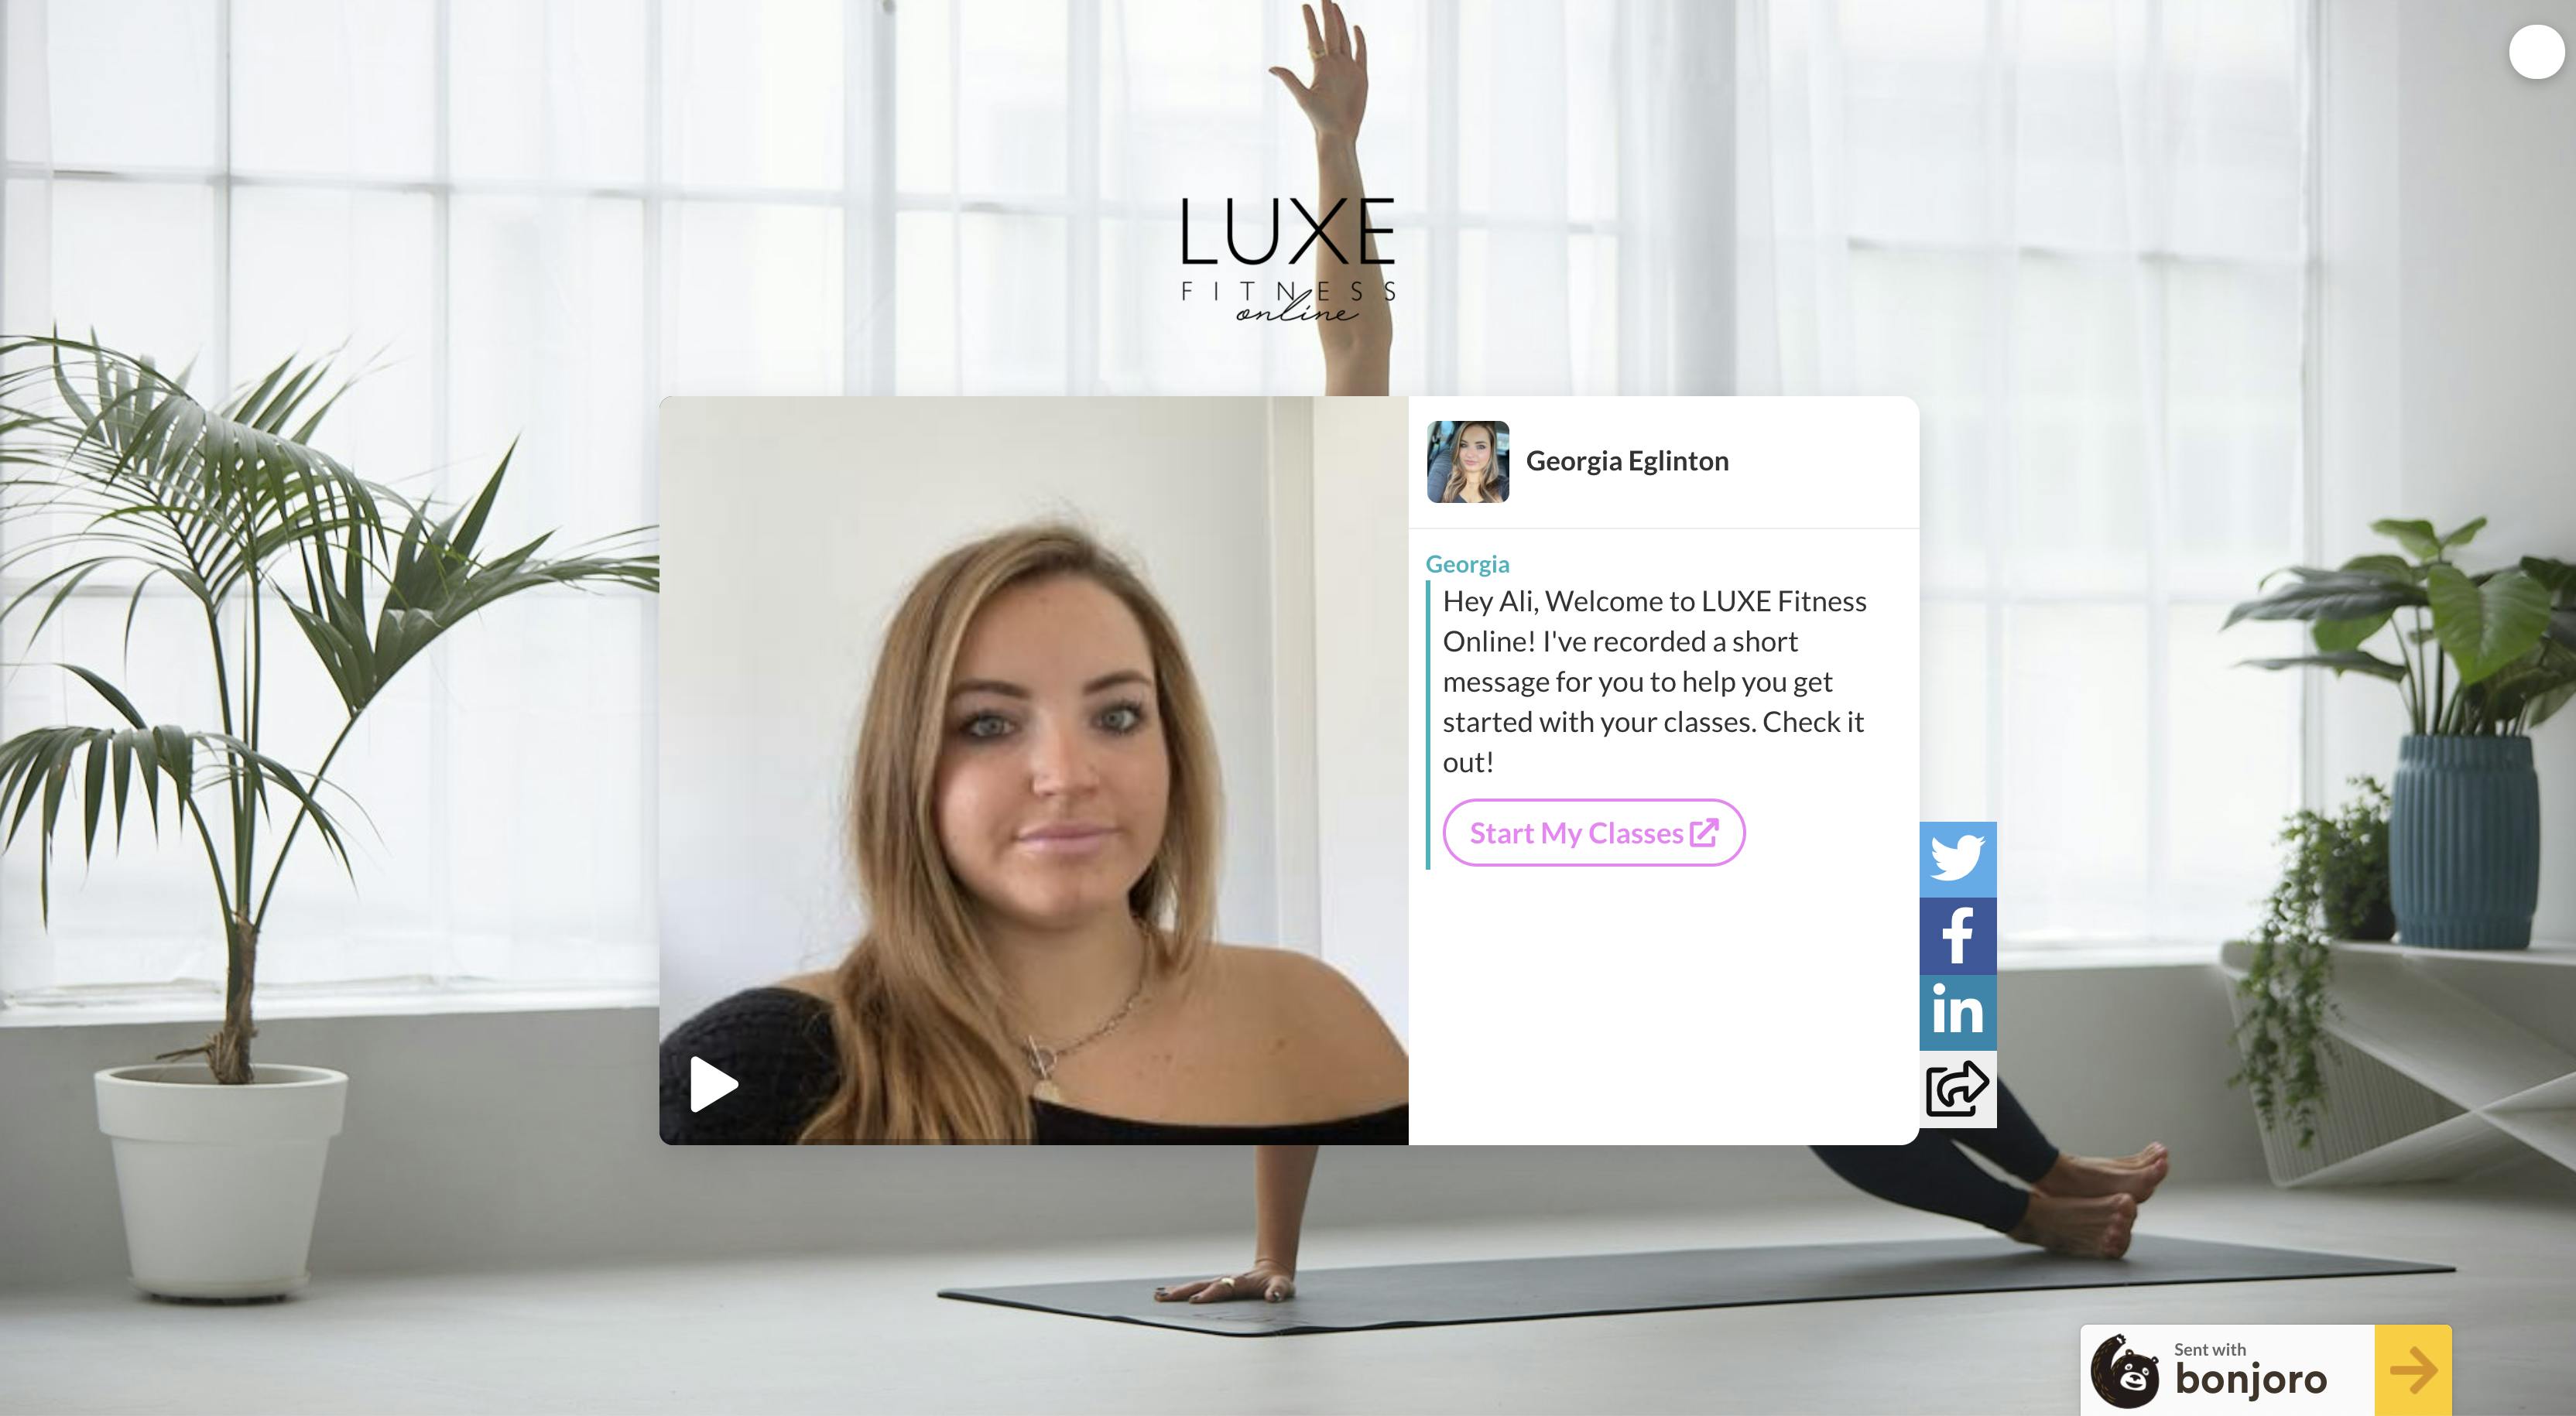
For example, one of our clients used their onboarding videos to direct their users to the specific courses they can use to start their fitness journey:
Provide a run-down of your product
The best thing you can do is fully dedicate yourself to providing value. Don’t leave anything to chance and tell your users exactly how to use your product/service to get the most value.
If you can, invite them to a 1-on-1 call where you can explain everything in great depth and make sure they realize all the opportunities and features they have at their disposal.
However, many prospects might find this too intrusive. If that’s the case, you can do the run-down on your own. Create a video with a screen recording and go through everything you find important.
Make sure you highlight all the things that make your product unique and explain how to use those features that can provide value from day one.
Sending onboarding videos with Bonjoro
If video is a big part of your customer onboarding strategy, you can use Bonjoro to send personalized videos as soon as someone signs up for your platform or makes their first purchase.

It’s easy and it requires zero coding or video editing knowledge!
Here is how you can do that in a few simple steps.
Step 1: Set up your email
Before you start sending your personalized videos, you’ll want to set up your email.
In other words, you’ll want to link your own email to Bonjoro so that your users know the message is coming from you. This can improve your email deliverability and increase the chances of users interacting with your content.
There are two ways to do this in Bonjoro:
- Domain Verification and CNAME record entry: this is the standard for sending Bonjoros with maximum deliverability. You can verify a domain with us and quickly send it from any email address that exists at that domain.
- oAuth Mail integrations: you can integrate your Gmail or Outlook email with Bonjoro. It takes only a few moments but, in our experience, it displays poorly in some email clients. This can be a good way to get started quickly but we always recommend domain verification as the best long-term solution.
Take a look at our guide on sending messages from your address.
Keep in mind, however, that this isn’t an obligatory step. All users get a default Bonjoro email address that’s used for sending emails and receiving replies.
Adding your own email address will set you up for success and ensure you get the best results.
Create a task and send videos
The next thing you’ll need to do is create a Task.
In Bonjoro, Tasks are your key actions. Sending an onboarding video to a new sign-up, a “thank you” video to a donor, a sales video to your outbound lead—all of these are Tasks you can create easily.
Click on the “New” button to create a task and select “Add a person” from the dropdown list.

There, you’ll go through a quick five-step process of entering your customer’s name, email, giving the task an identifier, and assigning it to your team.
After you’ve added a person, they’ll show up on the task list on the left. Clicking on any of these contacts will show their details in the window on the right. From there, clicking on the “Record Now” button will open up the recording interface and start up your PC/laptop camera.
This part is simple:
1. Hit the “Record” button and start recording your video message. Hit the same button again to stop.
2. Pick your thumbnail. Here’s a pro tip: start your video by smiling and waving, and you’ll have the perfect thumbnail every time!
3. Choose a message template to make your video even more personal. Use your customer’s name and write an enticing line that will make them more likely to open your message.
4. Hit “Confirm & send”, wait for the video to upload, and you’re done!
Here's a video showing your how it's done:
Once the video is sent, you’ll be able to see all replies in your Tasks dashboard, as well as send your own replies directly through Bonjoro.
Leverage automation: integrate with other tools
But, here’s the best part: you don’t have to do all of this manually.
Think about it, if you were to manually send a video to each new user, you’d have to get their emails and repeat this process every time. Bonjoro allows for integrations with CRM and other software that make this much easier.
All you need to do is set up a trigger event (e.g. New Subscriber) and a “Do this” step. For pretty much all Bonjoro integrations, the “Do this” step is creating a task to send a message to the contact that has completed the trigger action.

In other words, you can create an automated funnel where you can send a video message to each new subscriber or customer.
For example, you can do this by integrating with Intercom. It takes only a few moments but it creates a powerful funnel that saves you a lot of time in the long run!

That’s exactly what we did back in 2017—it helped us get a 32.7% increase in trial-to-paid conversion rates and become one of Australia’s fastest-growing startups.
Video onboarding checklist 📝
Finally, here’s our customer onboarding checklist to wrap everything up and give you actionable steps you need to take to make sure your video onboarding works as best as possible.
1. Get personal. Video is the perfect medium to speak directly to your users and create a meaningful connection. It will show them you care about their experience and you’re dedicated to delivering the best possible service.
2. Highlight what’s valuable. Make sure your new customers realize the most valuable features/qualities of your product as early as possible. Either try to schedule one-on-one demo calls or point them to useful resources.
3. Send videos with Bonjoro. They’re easy to create and it takes a few minutes to record, upload, and send a video. You can also keep track of all your interactions in one place, have conversations, see how your videos are doing, and much more.
4. Integrate with other tools. To make everything easier, you’ll want to integrate with a CRM or other tools that allow you to track new sign-ups. That way, you don’t have to enter each new customer manually, you can just use automated workflows for a better, quicker experience.
The final word
There you go—that’s all you need for a good video onboarding experience, both for you and your customers.
Recording a video for each new customer might seem like a lot of work but, from everything we’ve seen, it pays off in a major way. The personal touch is what can separate you from other brands on the market and charm your customers.
Plus, with a service like Bonjoro, the whole process is simple and fun!
You have everything in one place—from uploading contacts and recording a video to writing messages and tracking your results.
Register for a free trial and check out just how easy it is!

